When a creative idea pops up, I believe anyone would like to explore it as soon as possible. When it comes to make a prototype of a future product during feasibility study phase, developers definitely would like to make it as quick as possible to shorter time to the market of the product. If you are new to embedded world in general, or to our RX MCU in particular, and you might want to start your learning curve by exploring a platform that would provide you a basic function in affordable cost. To these needs, Target Board for RX Family is proven an excellent choice.
To begin with, Target Board for RX Family is a series of entry-level boards of Renesas 32-bit RX MCU, extensively from low-power consumption entry line RX100 Series, optimized balance of performance and power consumption RX200 Series, to the powerful performance RX600 Series. As you might guess, these boards are shared design concepts, so once you are familiar to one kit, you could easily apply your gained knowledge or what you have built for the previous kit to the next kit with no time or little time. The design concept behind Target Board series is really simple and no new to the word: Minimum Viable Product, which means we include the most necessary hardware on the boards and provide expansion options for end user fulfill their own creativity.
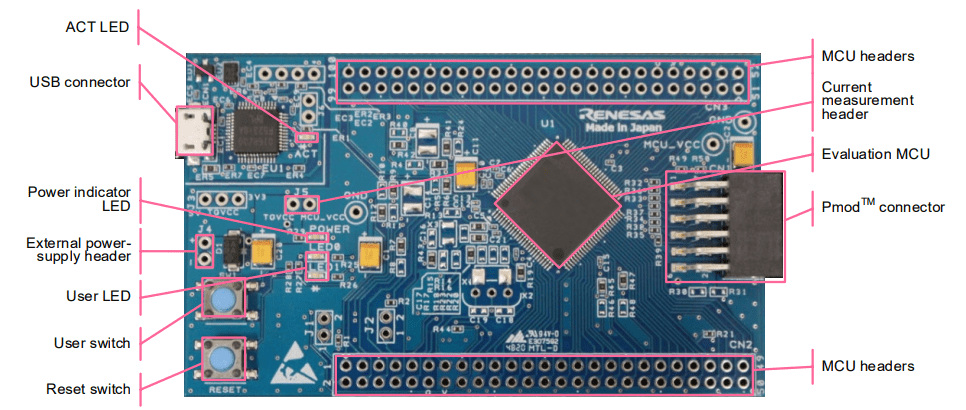
Let me walk you through the hardware structure of Target Board by the example of Target Board for RX671. The heart of every board is its RX MCU, in this case, it is RX671, the latest high-performance RX600 series with the most powerful RXv3 core. Then the basic functions are placed around the MCU, consisting of switches, LEDs, headers for external power or current measurement, in order to keep the board simply and provide users fundamental functions to evaluate an MCU. Along sides of the board, there are 2 through-hole headers connecting to MCU pin and at the right-end of the board, there is 1 Pmod™ connector for expansion options. These options let user freely implement any innovative ideas on the board. Finally, the board is equipped with on-board E2-Lite emulator. It means you don’t need extra cost for standalone emulator to debug or flash your software to the target MCU, all you need is just a USB cable to connect the board to a host PC.

Now if you are RX MCU newbie, you may wonder how to start to develop a project with the board. And here is our answer. We have prepared a simple sample, a LED blinking project, to give you the overview of evaluation process. I could start a long, maybe boring, description starting how to download and install our IDE and go on, but I think it is more intuitive if you check the video below. If needed, the links for more detail guidance are put in QR code in the corresponding scene. Truth be told, our e2 studio IDE offers a lot more powerful functions for software development and you could access to our RX Family Software & Tool Course to start your learn path right now.
If you are here, I hope you enjoyed the video. Now I think you are ready to start trying your original idea into our Target Board. Have fun!


