Overview
Uhuru Technical Rockstars provides Milkcocoa, a service using a cloud platform for real-time data transfer. Have some fun with Milkcocoa by combining the GR-COTTON board and the ESP8266 Wi-Fi module.
Preparation
Connect the ESP8266 module to the GR-COTTON board as shown in the photo. Designate the I/O15 pin as Low and the EN pin as High to use the module in AT command mode. After assembling the electronic circuit, use the USB cable (Micro B type) to connect it to the computer. For more information on and to purchase the ESP8266 Wi-Fi module visit the SparkFun Electronics website.

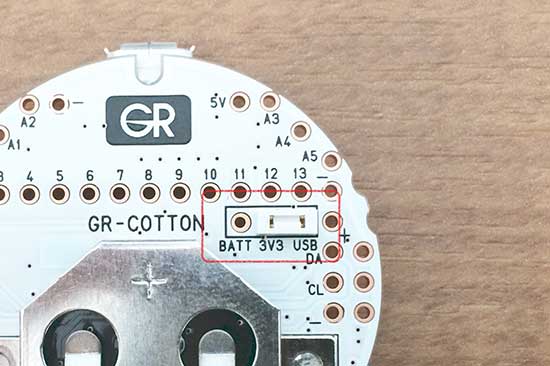
Make sure the white jumper on the reverse side of GR-COTTON is moved to the “3V3 USB” side. If it is set to the BATT side, remove and reinsert it into the USB side.


Creating an App with Milkcocoa
Log in to use the Milkcocoa service and create an app. You may wish to take the Milkcocoa tutorial to gain an overview of Milkcocoa before creating the app.
1. Login
Access the Milkcocoa page and log in. You will need to create an account before you are able to log in.

2. Creating an Application
Press the Create App button and assign a name to create an app. The screenshot to the right shows an app created with the name “GR”.

3. Copy the app_id
Clicking on the created app opens a screen showing an overview of the app. You can access the cloud with the information on this screen, but you will need the app_id later on, so be sure to copy it for future use.

Accessing Milkcocoa with GR-COTTON
Create a Project
Create a project using the library for accessing Milkcocoa located in the web compiler template.

Editing the Sketch
Open gr_sketch.cpp and edit the four sections shown below. Then build and write cotton_sketch.bin to GR-COTTON. Refer to the following site if you need a reminder of how to write a sketch to GR-COTTON: Sketch with Web Compiler.
*WLAN_SSID: Access point SSID
*WLAN_PASS: Access point password
*MILKCOCOA_APP_ID: app_id for the app created with Milkcocoa
*MILKCOCOA_DATASTORE: Assign a name (MILK_COTTON is used here)

Confirming Operations
After writing the sketch to GR-COTTON, confirm using the KurumiWriter serial monitor. The screen shown to the right shows successful access of Milkcocoa, with [onpush] and [30 (degrees)] displayed at the bottom of the monitor.
The sample sends the measured temperature from GR-COTTON to Milkcocoa in a push notification every 7 seconds. Then, when a push notification is received from Milkcocoa, the temperature is displayed on the monitor. When multiple GR-COTTON boards are linked to Milkcocoa, it can receive multiple transmissions simultaneously.

Let’s take a look at Milkcocoa data storage. You can see that every 7 seconds, the message {“v”.**(temperature)} is uploaded.

Controlling GR-COTTON Using a Web Browser
This example shows how a web browser is used to turn on the GR-COTTON LED and display detection of button switch activation.

GR-COTTON Sample
The following shows a GR-COTTON sample. Change the lines from void setup () in the default gr_sketch.cpp with the following:
boolean g_sw_push = 0;
void sw_push(){
  g_sw_push = 1;
  delayMicroseconds(1000); // for cutting chattering
}
void setup() {
  Serial.begin(9600);
  pinMode(2, INPUT_PULLUP);
  attachInterrupt(0, sw_push, FALLING);
  pinMode(22, OUTPUT);
  pinMode(23, OUTPUT);
  pinMode(24, OUTPUT);
  digitalWrite(22, HIGH);
  digitalWrite(23, HIGH);
  digitalWrite(24, HIGH);

  Serial.println("wait 3sec...");
  delay(3*1000);
  // Connect to WiFi access point.
  Serial.print("Connecting to ");
  Serial.println(WLAN_SSID);
  wifi.begin(ESP_Serial, 115200);
  if (wifi.setOprToStation()) {
      Serial.print("to station ok\r\n");
  } else {
      Serial.print("to station err\r\n");
  }
  if (wifi.joinAP(WLAN_SSID, WLAN_PASS)) {
      Serial.print("Join AP success\r\n");
      Serial.print("IP: ");
      Serial.println(wifi.getLocalIP().c_str());
  } else {
      Serial.print("Join AP failure\r\n");
  }
  if (wifi.disableMUX()) {
      Serial.print("single ok\r\n");
  } else {
      Serial.print("single err\r\n");
  }

  if(milkcocoa.on(MILKCOCOA_DATASTORE, "push", onpush)){
      Serial.println("milkcocoa on success");
  }
  else {
      Serial.println("milkcocoa on failure");
  }

}

void loop() {
  milkcocoa.loop();

  if(g_sw_push == 1){
    DataElement elem = DataElement();
    elem.setValue("v", 3);
    milkcocoa.push(MILKCOCOA_DATASTORE, &elem);
    delay(500);
    elem.setValue("v", 4);
    milkcocoa.push(MILKCOCOA_DATASTORE, &elem);
    g_sw_push = 0;
  }
}

void onpush(DataElement *pelem) {
    int data = pelem->getInt("v");
    Serial.print("onpush:");
    Serial.println(data);
  if(data == 0){
    digitalWrite(22, !digitalRead(22));
  };
  if(data == 1){
    digitalWrite(23, !digitalRead(23));
  };
  if(data == 2){
    digitalWrite(24, !digitalRead(24));
  };
}
Web Browser Sample
This is a Web browser sample. Assign a file name such as [sample.html] for the HTML source code below and save.
Replace the [var milkcocoa = new MilkCocoa(‘hotirprfik2.mlkcca.com’);] section with the Connect code shown on the Milkcocoa overview page.

<!DOCTYPE html>
<html lang="ja">
<head>
    <meta charset="UTF-8">
    <title>Document</title>
</head>
<body>
    <p>GR-COTTON LED Control</p>
    <script src="https://cdn.mlkcca.com/v0.6.0/milkcocoa.js"></script>
    <button id="r">R</button>
    <button id="g">G</button>
    <button id="b">B</button>
    <p>GR-COTTON SW Monitor</p>
    <p id="sw">(_ _)ZZZ</p>
    <script>
        var milkcocoa = new MilkCocoa('hotirprfik2.mlkcca.com');
        var dataStore = milkcocoa.dataStore("MILK_COTTON");
        document.getElementById("r").onclick = function(e){
          dataStore.push({v:0});
        }
        document.getElementById("g").onclick = function(e){
          dataStore.push({v:1});
        }
        document.getElementById("b").onclick = function(e){
          dataStore.push({v:2});
        }
        dataStore.on("push",function(d){
          if(d.value.v == 3) {
            document.getElementById("sw").innerHTML="(o o)/";
          } else if(d.value.v == 4) {
            document.getElementById("sw").innerHTML="(o o)";
          }
        });
    </script>
</body>
</html>
Confirming Operations
Execute the GR-COTTON sketch, connect to Milkcocoa, and press the sample.html button. This turns on the LED. Pressing the button once again turns the lights off.
Pressing the GR-COTTON button switch activates [(_ _)ZZZ], [(o o)/] appears revealing a hand waving. This is an example of how GR-COTTON and the browser communicate with each other.
You can control the system remotely either by saving the HTML source on the server or by using the smartphone app. Experiment with variations!